

How To Install A Cast Iron Bathtub Video
![]()
Terry
The Plumbing Sorcerer
- #i
Installing or setting a Kohler Villager Cast Fe Tub.
The Villager weighs in at 316 pounds.
It's best to bring it in with two men.
Iv men would be okay likewise.
Once it's in the bathroom, I tin can ready information technology into the apse by myself without help.
I employ a ledger board on the back wall, making sure it'south level kickoff.
Exit the tub in the crate, it stacks easier that way, and gives you some nice hand holds.
I like to centre the tub at the hips, and lean it on my back. So I have a guy or two concord the dorsum of the crate and follow backside me.
I carry it like I'k giving someone a piggy dorsum ride.
When I get it into the bathroom, I set information technology in vertically with the bleed side downwardly, with the open up function of the bathing well towards the tub valve.
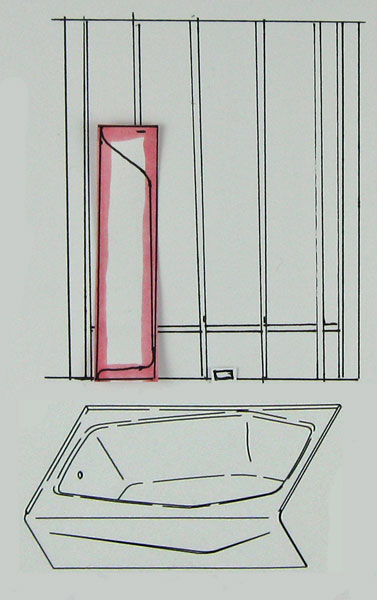
I make sure I have two 2x4's with me.
I, I place on the floor, this prevents the tub from falling all the way down, and can deed like a pivot with the second 2x4
The 2x4 on the floor doesn't have to be real long.
On a remodel, the showtime thing you check for is floor level.
I mensurate out where the apron will hit, commonly 30" from the back wall on a Villager and using a level observe out which finish is high. I so take the level and measure back for the back wall ledger board. Doing this means if there is a low cease, that volition need shimming.
Out of level somewhere requires something to prevent the wicked rocking. I often have to shim the front frock on an older remodel.
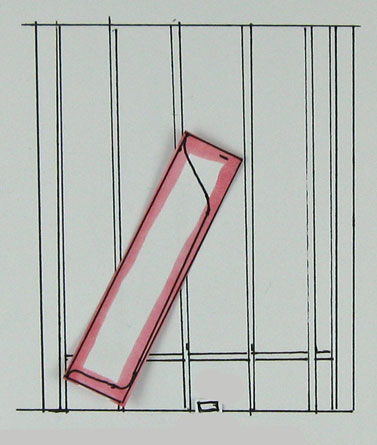
After I pull the crate off, I can start letting the tub drop back against the back wall. With the crate off, information technology will pull toward the dorsum wall, and catch on the studs.
To get past the stud, I accept to pull the tub toward me, and slid it by.

Nearly in that location.
Last edited:
![]()
Terry
The Plumbing Sorcerer
- #2
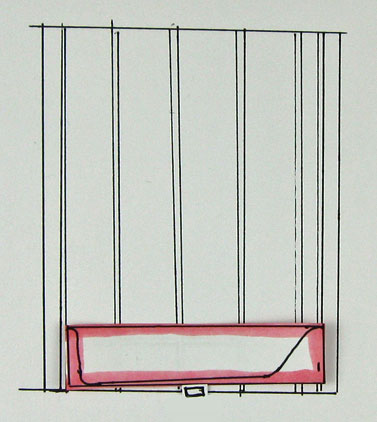
At this point, the tub has dropped down to the flooring level.
I leave a bit of drywall out on the room side of the tub on the end away from the drain.
The apron will fall into that space.
I leave a 2x4 on the flooring to prevent the tub from dropping likewise far.
If I need to lift the drain side of the tub up, I tin use a second 2x4 and lever it upwards, using the 2x4 on the floor equally a pivot.
This way, I'm pushing down, and non lifting upwards.
At the concluding scrap, I pull the last 2x4 from below the tub.
If the tub needs sliding in, I tin can sit on the floor, and utilize my legs to push button information technology in.
If the tub is in the room, I can ready it past myself.
Last edited:
![]()
hj
Primary Plumber
- #iii
tub
WAAAAAAY too hard. You are a glutton for penalization and a candidate for a bad dorsum. It is besides commonly not possible to remove the drywall from the contrary side for a remodel/replacement installation. I use the "Egyptian pyramid" method, which employs as little try as possible along with the maximum employ of leverage.
ON some tubs a 2x4 ledger is too thick and it hits the radius of the tub. For those, or if you are not certain, use a 1x4. As for getting it into the space. Lay the tub on the flooring with the apron on the bottom. Get it into the approximate position. Remove the front, top, and back of the crate. Place "something" on the floor, (cardboard, or 1x2 strips, or anything similar to protect the tub edge), and slide the tub off the crate onto it.And so, depending on how large the recess is, either whorl the tub downward and onto the ledger, or angle it in betwixt the studs on one terminate, so turn the tub parallel to the back wall and roll it down into position. When the tub bleed is installed depends on your space. If you have access later the tub is in position, put it together terminal. Otherwise, get together it on the tub, remove the assembly and put it into position while connecting it to the drain, then put the tub in place over it.
Last edited past a moderator:
![]()
Terry
The Plumbing Wizard
- #5
"Egyptian pyramid" method
At present I know that hj has been plumbing longer then me, and is very wise and cabable.
Just wait! Did he besides work on the pyramids?
I need to make him an avatar with a pyramid now.
I'm certain that hj knows what he is doing.
I would love to come across him install 1, old guys practice information technology meliorate.
The way I practice information technology, was from an onetime guy, merely there are e'er many means to do things.
At present if we tin can only talk hj into posting some pictures.

Some of the earliest history of the Pyramid comes from a Greek traveler named Herodotus of Halicanassus. He visited Arab republic of egypt effectually 450 BC and included a clarification of the Keen Pyramid in a history book he wrote. Herodotus was told past his Egyptian guides that information technology took twenty-years for a forcefulness of 100,000 oppressed slaves to build the pyramid. Stones were lifted into position by the use of immense machines. The purpose of the structure, according to Herodotus's sources, was as a tomb for the Pharaoh Khufu (whom the Greeks referred to equally Cheops).
Last edited:
![]()
hj
Master Plumber
- #six
tub
Actually, it is nigh easier to exercise it than to describe HOW to do it. IF the tub is going into a recess with a articulatio genus wall or other way that the tub tin can fit in front of the opening, then yous START with the tub in the location of Terry's second posting, (otherwise y'all become the tub equally close to the terminal location equally possible, usually at an bending), but with the tub laying on the frock in the crate. You lot remove the crate except for the bottom piece the tub is on. Then y'all slide the tub out of the crate onto a couple of boards, 2x4's are best because they are the same thickness as the lesser plate of the wall. So you toss the last piece of the crate away to get rid of it. If the tub is on an angle, y'all slide it forward and then the upper edge goes into the space betwixt studs. And then you rotate it square with the dorsum wall. At this time your tub is at the recess, betwixt the two walls. And so you gradually rotate it downward onto the ledger board. If you accept it is the right position to starting time with the tub will hit the rear studs earlier reaching the ledger. And then you can permit go of it and get your hands out of the mode. The tub volition continue down past itself, or you lot can push it if necessary. Now all y'all have to do is jack the front up a bit and remove the two boards. With a 2 cycle manus cart to move the tub into the room it is a i man job. In fact two men might get in each other's way.
Final edited:
- #nine
Here you go. Simply a reminder, this is my parents home. The house I inherited from grandma is exactly the same. Same builder back in the day. Simply difference is that in that location is tile in her bath instead of carpet.
Terminal edited by a moderator:
![]()
Terry
The Plumbing Wizard
- #17
I've never heard of anyone breaking a cast fe tub by installing or moving them. I have removed sometime tubs by smashing them with a sledge hammer. I don't know why you would h2o proof under a cast tub. They accept a drain that goes through the floor, commonly I cut an 8" x 12" hole for the waste and overflow.

Source: https://terrylove.com/forums/index.php?threads/installing-a-kohler-villager-cast-iron-tub.33212/
Posted by: bakerpludenis.blogspot.com
0 Response to "How To Install A Cast Iron Bathtub Video"
Post a Comment